> For the complete documentation index, see [llms.txt](https://kb.vimzaa.com/llms.txt). Markdown versions of documentation pages are available by appending `.md` to page URLs; this page is available as [Markdown](https://kb.vimzaa.com/virtual-private-servers/connect-with-ssh.md).
# Connect with SSH
Virtual Private Servers are managed using a terminal and SSH. You’ll need to have an SSH client and, optionally, an SSH key pair. Clients generally authenticate either using passwords (which are less secure and not recommended) or SSH keys (which are very secure and strongly recommended).
To log in to your VPS with SSH, you need three pieces of information:
* The VPS IP address
* The default username on the server
* The default password for that username, if you aren’t using SSH keys
To get your VPS's IP address, visit the [VPS Control Panel](https://vps.vimzaa.com). The IP address will be displayed in the **IP Address** column under your VPS Hostname. You can mouse over it to copy it into your clipboard.
The default username is `root` on most operating systems, like Ubuntu and CentOS. Exceptions to this include CoreOS, where you’ll log in as `core`, Rancher, where you’ll log in as `rancher`, and FreeBSD, where you’ll log in as `freebsd`.
By default, the password for that user is randomly generated and emailed to you at your account’s email address.
Once you have your VPS IP address, username, and password (if necessary), follow the instructions for your SSH client. OpenSSH is included on Linux and macOS. Windows users with Bash also have access to OpenSSH. Windows users without Bash can use PuTTY.
## How to Connect to your VPS with OpenSSH on Linux or macOS
To connect, you’ll need to open an SSH terminal. How you do this varies between operating systems and window managers, but generally you can:
* **Linux**: Search Terminal or press `CTRL+ALT+T`.
* **macOS**: Search Terminal.
* **Bash on Windows**: Search Bash.
Once the terminal is open, enter the following SSH command. Make sure to substitute in your VPS’s IP address after the `@`. If you’re using CoreOS, Rancher, or FreeBSD, the username will be `core`, `rancher`, or `freebsd` instead of `root`, respectively.
```
ssh username@203.0.113.0
```
If you have multiple SSH keys, you may need to specify the path of your private key using the `-i` flag. Make sure to substitute in the pato your private key.
```
ssh -i /path/to/private/key username@203.0.113.0
```
The very first time you log in, the server isn’t identified on your local machine, so you’ll be asked if you’re sure you want to continue connecting. You can type `yes` and then press `ENTER`.
```
The authenticity of host '203.0.113.0 (203.0.113.0)' can't be established.
ECDSA key fingerprint is SHA256:IcLk6dLi+0yTOB6d7x1GMgExamplewZ2BuMn5/I5Jvo.
Are you sure you want to continue connecting (yes/no)? yes
```
Next, a host key fingerprint will be saved to your local machine and you’ll receive this confirmation:
```
Warning: Permanently added '203.0.113.0' (ECDSA) to the list of known hosts.
```
You may receive an intimidating-looking remote host identification warning:
```
@@@@@@@@@@@@@@@@@@@@@@@@@@@@@@@@@@@@@@@@@@@@@@@@@@@@@@@@@@@
@ WARNING: REMOTE HOST IDENTIFICATION HAS CHANGED! @
@@@@@@@@@@@@@@@@@@@@@@@@@@@@@@@@@@@@@@@@@@@@@@@@@@@@@@@@@@@
IT IS POSSIBLE THAT SOMEONE IS DOING SOMETHING NASTY!
Someone could be eavesdropping on you right now (man-in-the-middle attack)!
It is also possible that a host key has just been changed.
```
This happens most often when you’ve destroyed a VPS immediately before creating and trying to connect to a new one. If the new VPS gets assigned the same IP address as the VPS that was destroyed, the host key of the old server is stored and conflicts with the new host key.
If this happens, you can delete the old VPS’s host key from your local system with the command `ssh-keygen -R 203.0.113.0` and then reconnect.
The next part of the connection process is authentication. If you’ve added SSH keys, you’ll connect to the VPS immediately (or after entering the passphrase for your key pair).
If you haven’t added SSH keys, you’ll be prompted for your password:
```
root@203.0.113.0's password:
```
When you enter your password, nothing is displayed in the terminal, so it can be easier to paste in the initial password. Pasting into text-based terminals is different than other desktop applications and is also different from one window manager to another:
* For Linux Gnome Terminal, use `CTRL+SHIFT+V`.
* For macOS, use `SHIFT-CMD-V` or the middle mouse button.
* For Bash on Windows, right-click on the window bar, choose **Edit**, then **Paste**. You can also right-click to paste if you enable QuickEdit mode.
Once you’ve entered the password, press `ENTER`.
E-mailed passwords aren’t secure, so the first time you log in with the default password, you will immediately be prompted to change it.
```
. . .
Changing password for root.
```
To do that, first re-enter the current password, then press `ENTER`. Nothing will display on the screen when you type.
```
(current) UNIX password:
```
After that, enter your new password and press `ENTER`. Again, nothing will display on the screen as you type. You’ll be asked to supply the new password a second time to confirm that you’ve typed it accurately.
```
Enter new UNIX password:
Retype new UNIX password:
```
When you’ve successfully logged in, you’ll receive an operating system-specific welcome screen. Your command prompt will change to display the username you’ve logged in as, separated by the `@` symbol from the hostname of the VPS, like `root@ubuntu-512mb-sfo2-01:~#`.
## How to Connect to your VPS with PuTTY on Windows
[PuTTY](http://www.putty.org/) is an open-source SSH and Telnet client for Windows. It allows you to securely connect to remote servers from a local Windows computer.
If you don’t have PuTTY installed, visit the [Download PuTTY site](http://www.chiark.greenend.org.uk/~sgtatham/putty/download.html) and choose the Windows installer from the **Package files** list. Once PuTTY is installed, start the program.
### Configuring PuTTY
On the **PuTTY Configuration** screen that opens, fill in the field labeled **Host Name (or IP Address)** with your VPS’s IP address, which you can find on [your dashboard](https://vps.vimzaa.com). Confirm that the **Port** is set to `22` and that the **Connection type** `SSH` is selected.

Next, click on **SSH** in the left sidebar (under **Connection**). Make sure “2 only” is selected for **Preferred SSH protocol version**.
If you want to created an SSH key pair, you can add them in the **Auth** subcategory. In the **Private key file for authentication**section, click the **Browse** button.

Search for the private key file that you saved. This is the key that ends in `.ppk`. Find it and select “Open” in the file window.
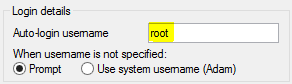
Next, in the **Connection** subheading in the **Data** configuration section, enter your server’s username in the **Auto-login username** field. For the initial setup, this should be the `root` user, which is the administrative user of your server. If you’re using CoreOS, Rancher, or FreeBSD, the username will be `core`, `rancher`, or `freebsd` instead of `root`, respectively.
Finally, you can save these preferences to avoid typing them manually in the future. Click on **Session** in the left sidebar, then add a name in the text box under **Saved Sessions** and click **Save** on the right.
You now have saved all of the configuration data needed to connect to your new server.
### Connecting with PuTTY
Once you have a session saved, you can recall these values at any time by returning to the **Session** screen, selecting the session you would like to use in the **Saved Sessions** section, and clicking **Load** to recall the settings. This will auto-fill all of the fields with the values you initially selected.
Before you connect to a server for the first time, PuTTY will ask you to confirm that you trust the server. Choose **Yes** to save the server identity in PuTTY’s cache or **No** to connect without saving the identity.

After PuTTY starts, type in the root password that was emailed to you. If you uploaded SSH keys, you will either be connected directly or prompted for the password you set on your key.
When you have successfully authenticated, you will be connected to your new VPS.