How to Add SSH Keys to VPS
While it is possible to manage your servers using password-based logins, it is often a better idea to set up and use SSH key pairs. SSH keys are more secure than passwords, and can help you log in without having to remember long passwords.
To use SSH keys with your virtual private servers, you need to create an SSH key using an SSH client installed on your local computer. OpenSSH is included on Linux, macOS, and Windows Subsystem for Linux. Windows users without Bash can PuTTY.
How to Create SSH Keys with OpenSSH on Linux or macOS
The standard OpenSSH suite of tools contains the ssh-keygen utility, which is used to generate key pairs. Run it on your local computer to generate a 2048-bit RSA key pair, which is fine for most uses.
ssh-keygenThe utility will prompt you to select a location for the keys. By default, the keys are stored in the ~/.ssh directory with the filenames id_rsa for the private key and id_rsa.pub for the public key. Using the default locations will allow your SSH client to automatically find your SSH keys when authenticating, so we recommend accepting them by pressing ENTER.
Generating public/private rsa key pair.
Enter file in which to save the key (/home/username/.ssh/id_rsa):
If you have previously generated a key pair, you may see a prompt that looks like this:
/home/username/.ssh/id_rsa already exists.
Overwrite (y/n)?
If you choose to overwrite the key on disk, you will not be able to authenticate using the previous key anymore. Selecting yes is an irreversible destructive process.
Once you select a location for the key, you’ll be prompted to enter an optional passphrase which encrypts the private key file on disk.
If you enter one, you will have to provide it every time you use this key (unless you are running SSH agent software that stores the decrypted key). We recommend using a passphrase, but you can press ENTER to bypass this prompt.
Created directory '/home/username/.ssh'.
Enter passphrase (empty for no passphrase):
Enter same passphrase again:
This is the last step in the creation process. You now have a public and private key that you can use to authenticate.
How to Create SSH Keys with PuTTY on Windows
To create and use SSH keys on Windows, you need to download and install both PuTTY, the utility used to connect to remote servers through SSH, and PuTTYgen, a utility used to create SSH keys.
On the PuTTY website, download the .msi file in the Package files section at the top of the page, under MSI (‘Windows Installer’). Next, install it on your local computer by double clicking it and using the installation wizard.
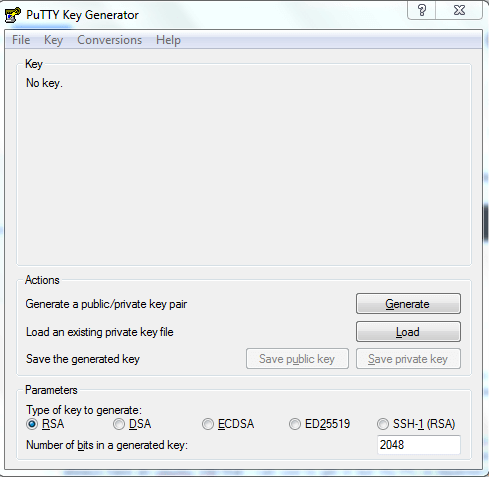
After the programs are installed, start the PuTTYgen program through your Start Menu or by tapping the Windows key and typing puttygen. The key generation program looks similar to this:

You can customize the Parameters at the bottom if you like, but the default values are appropriate in most situations. When you’re ready, click the Generate button on the right-hand side.
You might be prompted to “generate some randomness by moving the mouse over the blank area”. This randomness, known as entropy, is used to create keys in a secure fashion so that other people can’t reproduce them.

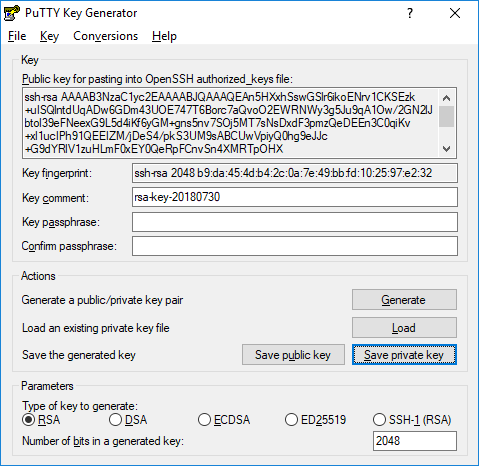
When the key is generated, you’ll see the public key displayed in a text box. Copy this into your clipboard now if you plan to add it to your servers. Be sure to scroll within the text area so you copy the entire key.

Click the Save private key button and select a secure location to keep it. You can name your key whatever you’d like, and the extension .ppk will be automatically added.
Working with PuTTY’s Public Key Format
You can click Save public key as well, but take note: The format PuTTYGen uses when it saves the public key is incompatible with the OpenSSH authorized_keys files used for SSH key authentication on Linux servers.
If you need to see the public key in the right format after the private key has been saved:
Click the Load button.
Navigate to the private key and open it.
The public key will be redisplayed again.
Click the Save private key button and select a secure location to keep it. You can name your key whatever you’d like, and the extension .ppk will be automatically added.
Working with PuTTY’s Public Key Format
You can click Save public key as well, but take note: The format PuTTYGen uses when it saves the public key is incompatible with the OpenSSH authorized_keys files used for SSH key authentication on Linux servers.
If you need to see the public key in the right format after the private key has been saved, either:
Click the Load button
Navigate to the private key and open it.
The public key will be redisplayed again.
Now that you have your generated key pair saved on your computer and ready to use.
How to Add SSH Keys to Your Virtual Private Server
There are several ways to add your public key to a server:
Using
ssh-copy-id, which is included in many Linux distributions’ OpenSSH packages. This is a good choice when you have password-based SSH access.By copying the contents of the key and piping the contents into the
~/.ssh/authorized_keysfile. This is a good choice when you have password-based SSH access but don’t havessh-copy-id.By adding the public key manually, which is necessary if you do not have password-based SSH access.
With ssh-copy-id and Password-Based Access
You can copy your SSH key using ssh-copy-id, substituting in the IP address of your VPS.
This will prompt you for the user account’s password on the remote system:
After typing in the password, the contents of your ~/.ssh/id_rsa.pub key will be appended to the end of the user account’s ~/.ssh/authorized_keys file:
After entering the password, it will copy your key, and you can log in without a password.
With ssh and Password-Based Access
If you do not have the ssh-copy-id utility available, but still have password-based SSH access to the remote server, you can pipe the contents of the key into the ssh command.
On the remote side, make sure the ~/.ssh directory exists, and then append the piped contents into the ~/.ssh/authorized_keys file. Substitute the IP address for your VPS.
You will be asked to supply the password for the remote account:
After entering the password, it will copy your key, and you can log in without a password.
Without Password-Based Access
If you do not have password-based SSH access available, you will have to add your public key to the remote server manually.
On your local machine, output the contents of your public key.
Copy the output.
Log into your VPS and create the ~/.ssh directory if it does not already exist:
Add the key to the ~/.ssh/authorized_keys. Make sure to substitute the contents of your public key.
The ~/.ssh directory and authorized_keys file must have specific restricted permissions (700 for ~/.ssh and 600 for authorized_keys). If they don’t, you won’t be able to log in.
Make sure the permissions and ownership of the files are correct.
You can now log in without a password.
Last updated